 ES
ES EN
ENAutomation by Website Activity: How to active and use it step by step
Website activity Automation: how to activate and use it
Doppler adds a new type of Automation so you can continue exploring and expanding your business opportunities.
Read this article carefully to learn more about Automation by Site Behavior and what steps you need to take to use it for free when you sign up for any of our Plans. Find out more!
What is ‘Automation by Website Activity’?
It allows you to see how your users navigate your website. By configuring one or more domains, you can track visits, link them to email addresses and activate automatic actions based on behaviour.
If you have used Email Automation before, this process will be familiar. The difference is that here, the process begins when a user visits a page on your site. From there, you can add conditions, associate lists, send emails and more.
Follow the steps below to discover how to use Website Activity Automation to improve your results.
Step one: configure the domain to start an Automation by Website Activity
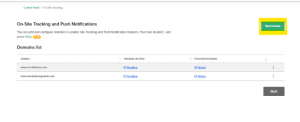
- First, you must add the domain you want to track to your Automation. To do this, go to:
Profile Photo – Control Panel – Campaign Preferences – Onsite Tracking, Push Notifications, and Onsite

2. Click on New Domain
💡 DopplerTip: Make sure to enable only the domains where you will implement tracking actions. This will facilitate verification and optimize Automation performance.
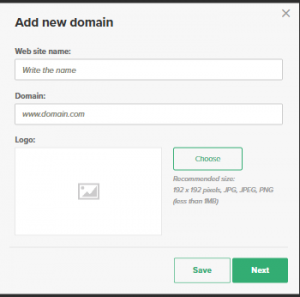
Enter the domains you want to track.
You can add up to 20 different domains to track.
Keep in mind that the same Doppler account can track multiple domains, but the same domain cannot be registered in more than one account.
💡 DopplerTip: Be sure to include the www. prefix if applicable to avoid verification errors.
4. Insert the Tracking Code into your Site
How to insert the tracking code in Tag Manager
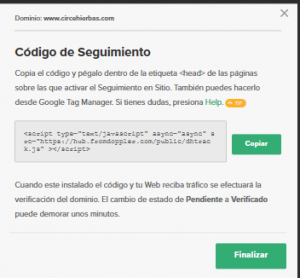
Once the domain is registered, you will receive a Tracking Code that you must insert into all the pages you want to track.
You can do this in two ways:
A.By pasting the code directly into the <head> tag of your website’s HTML.
B.By inserting it using Google Tag Manager.
Now:
- Click on “Tag.”
- Select the “Custom HTML Tag” option and paste the Tracking Code into the first line of the box.
- Scroll down and, under “Advanced Settings,” select the “All Pages” option.
If you prefer to do it manually, you must enter your site’s HTML and paste the Tracking Code before the closing </header> tag.
- Verify the registered domain
To complete the setup, browse at least once through the pages where you inserted the Tracking Code. Simply visiting them will be enough for the system to recognize them and verify the domain.
⚠️ This action is essential to complete the process. If you do not browse, you will not be able to start your Automation flows.
If your domain appears as “Unverified,” check the following points:
- You did not perform the required prior browsing.
- The Tracking Code was inserted incorrectly.
- The code was not inserted into the page.
Make sure you have completed all the above steps correctly.
Once the feature is enabled, the domain is added, and the code is inserted, click the “Verify” button to confirm that everything is set up correctly.
Step 2: Create an Automation by Website Activity from scratch
- Log in to your Doppler account and then go to Automation.

- Click Create Automation.

3. Then go to Create flow from scratch.
4. There you can select “Website Activity”
- Now that you have verified your domain, you can start your Automation. You will see the following screen:
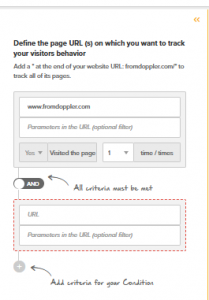
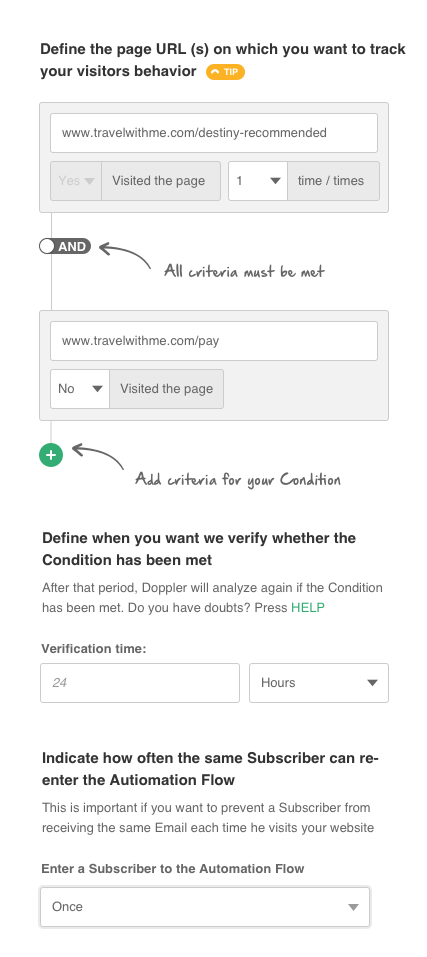
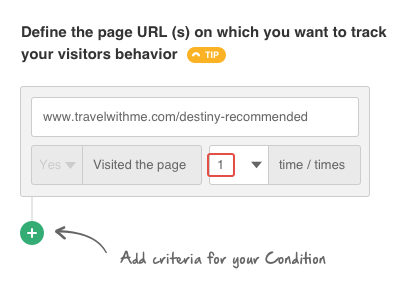
- Define the URL and visit frequency In this first step.
Enter the URL of the page you want to monitor and set how many times a Subscriber must visit it for the Automation to be triggered.

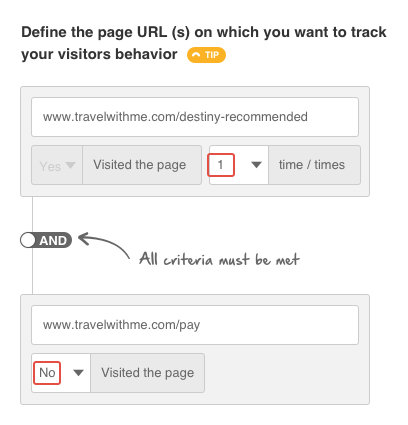
- Add additional conditions.
You can add one or more pages to create more specific conditions within your flow. You can also specify whether both conditions must be met, or if meeting only one of them is sufficient to trigger the automation.
If you define two conditions that must both be met (Condition 1 AND Condition 2), the second condition can be configured as follows:
- If visited
- Did not visit
💡 Doppler Tip: Use combinations of conditions to identify different behaviors, such as users who visited a product page but did not complete the purchase.
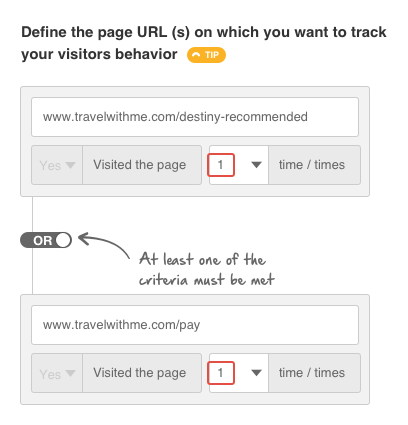
- Set up alternative conditions.
You can also specify that only one of the conditions is sufficient to trigger the automation.
- If you set two conditions and only one must be met (Condition 1 OR Condition 2), the second must be configured as “If visited.”
This means that the automation will be triggered when at least one of the configured conditions is met.
DopplerTip: use this option to cover more behavior scenarios and not limit the activation of the flow to a single user action.
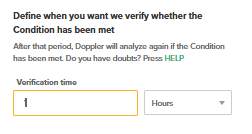
- Define the verification time
You must indicate when you want Doppler to verify whether the Condition has been met.
Once that time has elapsed, the system will reanalyze the Subscriber’s behavior to determine whether they meet the established conditions and, based on that, move forward in the flow.
Example:
Verification time: 1 hour
💡 DopplerTip: Adjust this time according to your Strategy’s logic. For example, if you expect the action to happen quickly (such as completing a purchase), you can use a short interval; if it is a more prolonged decision, set a longer time frame.
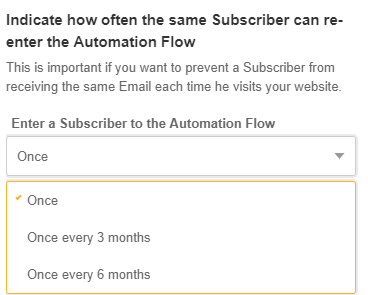
- Define the frequency of re-entry into the flow
Indicate how often the same Subscriber can re-enter the flow.
This setting prevents a person from receiving multiple Campaigns for repeatedly meeting the same conditions.
You can define the period according to your Strategy and the type of communication you carry out.
Available options:
- Once only
- Every 3 months
- Every 6 months
💡 DopplerTip: Adjust this value according to the frequency of your Campaigns. This will prevent you from saturating your Subscribers’ inboxes and maintain balanced communication.

Once you’ve done this, you’re ready to start creating the different stages of your Automation by Website Activity flow. Let’s get started!
Example of Automation by Website Activity
Using a website that sells vacation packages as an example, we will show you how to set up the flow.
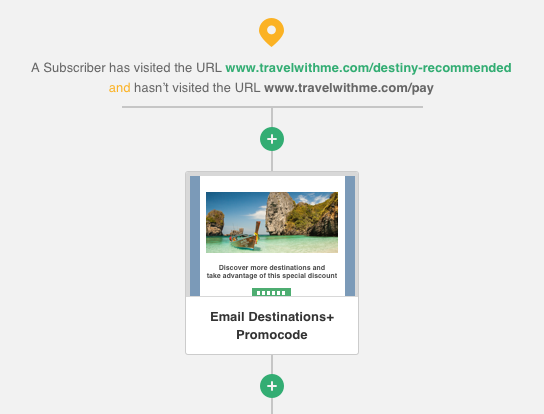
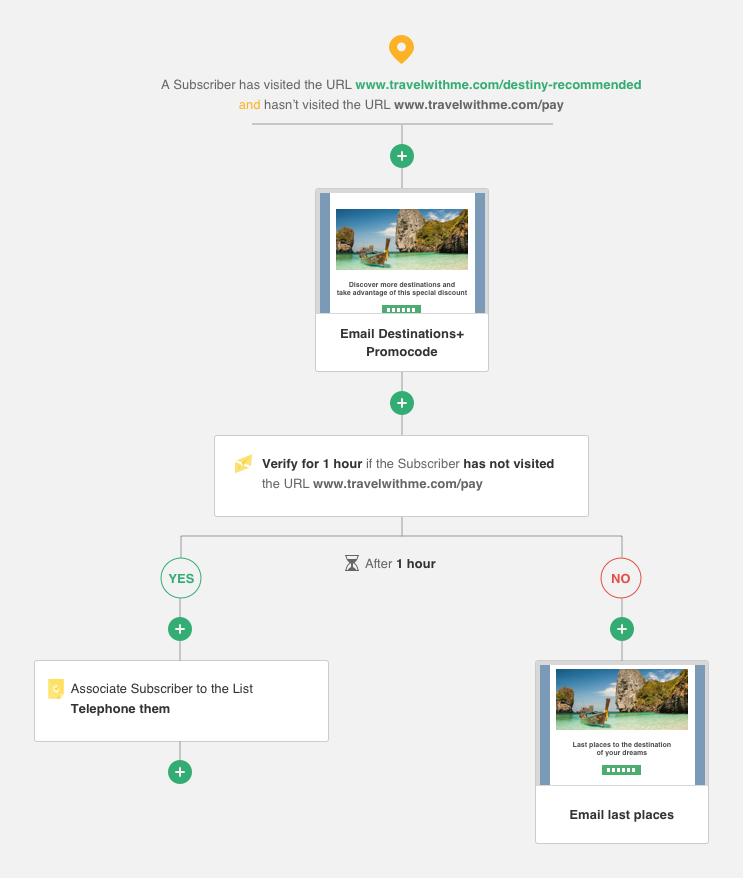
- The automation will be triggered when a subscriber browses any of the pages defined in the initial conditions. In this example, if they visited the “Recommended Destinations” page at least once and did not visit the “Make Your Payment” page.
- Here you must also configure the verification time so that, once it has elapsed, Doppler checks compliance with the initial conditions.
Next, you must set a waiting time to trigger the next action, sending an email, fulfilling a condition, or executing an action, just as you would when setting up any other automation.
In this example, it is determined that after a 1-hour wait, an email will be sent to the subscriber with recommended tourist destinations and a special price for bookings made through the website.
We could then set a verification time of one hour during which the Subscriber should visit the “Make Your Payment” page, and two actions for the case where they have done so and for the case where they have not.
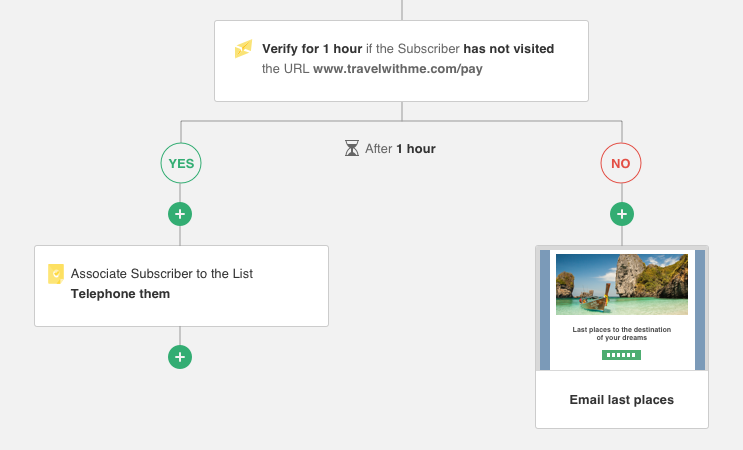
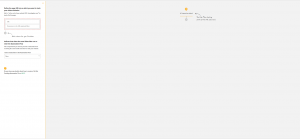
Once you have determined all the stages of your flow, click on “Start Automation.” Your Automation is now up and running! The final flow should look like this:
1. New Features in Website Activity Automation
With the latest improvements, Doppler incorporates new features that expand the possibilities for segmentation and personalization within Site Behavior Automation flows.
- Save URL parameters when initializing Automation
When a contact activates the Automation trigger, the system automatically saves all parameters from the URL of the initial visit.
Example:
https://tusitio.com/producto?product_id=45&utm_campaign=rebajas
The following parameters will be stored:
product_id = 45
utm_campaign = sales
These values can be used later in the flow in Conditions, branches, or personalized messages, allowing you to tailor the content to each user’s actual browsing experience.
2. Checking parameters in visited URLs
You can now configure a trigger or condition so that the automation is activated only when the visited URL contains specific parameters you define.
Configuration example:
Activate the Automation only if the URL contains utm_source=google
Activate if it includes category=shoes
Benefit:
This feature allows you to filter user behavior more accurately, segment specific actions, and increase the relevance of your automated messages.
Final considerations
To conclude, three final clarifications:
- Subscriber Origin
Subscribers who join your lists through Site Behavior tracking will be assigned Data Hub as their origin data.
You can verify this information from the Master Subscriber List by applying the Subscriber Origin filter.
💡 DopplerTip: This data will help you identify contacts that come from behavior on your website and make decisions such as mass association with a specific List to continue with personalized actions.


- Viewing metrics and flow steps
Once your Automation is active, you can access the metrics summary by clicking within the flow. If you select “View Full Report,” you will see all the detailed figures related to its performance.
In addition, you can browse the flow in read-only mode to view all the configured steps and understand how each stage of the Automation is executed.

- Editing or deleting the flow
If you want to edit or delete any element of your Automation, you must first click on “Stop Automation.”
Please note that when you do this, the Subscribers associated with that flow will stop executing linked behaviors or actions.
⚠️ Important: Once stopped, the flow will not continue processing sends or conditions until you reactivate it.

- Availability of metrics and subscriber management
The summary of metrics and the elements that make up each flow are available for all Automations you create with Doppler.
This way, you can analyze the performance of your Campaigns and optimize your Strategies based on the results obtained.
In addition, your Website Activity Automation may constantly add new subscribers.
If at any time you reach the contact limit for your plan, the system will not add new subscribers and will mark them as “Waiting for Plan Upgrade.”
To learn more about this feature and how to activate these contacts, see the article 👉 What are Waiting Contacts and how to activate them.
You can make it more complex by adding another page or deciding if one or both conditions must be fulfilled.
If you determinate two conditions and both must be fulfilled (Condition 1 “AND” Condition 2), you can choose that one of them might be “if visit” or “if not visit”.
 If you determinate two conditions and only one of them must be fulfilled (Condition 1 “OR” Condition 2) the second condition will necessarily be “if visit” in order to verify any behaviour and to start the Automation.
When you finish setting the initial conditions, you have to indicate how often a Subscriber can re-enter to the flow. The goal is not to receive multiple Campaigns according to a repetitive behaviour. The options are: only one time, every 3 months or every 6 months.
 Now you’ll be able to start creating every stage of the flow. Let’s go for it!
Define the stages of your Automation On-Site Tracking
Taking as example the Turism industry, now we’ll show you how to create the flow.
It will begin when a Subscriber visits one of the pages you had set before on the initial conditions. Following the example, this flow will be activated as soon as the user visits “Recommended Destiny” (but he doesn’t visit “Make your Payment” section).
At this step you also need to set the verification time so that, after that time has passed, Doppler can verify if the initial conditions were fulfilled or not.
After that, you have to set a “waiting time” to trigger the next action: sending an Email, the fulfillment of a condition or the execution of an action, just as you do when configuring any other Automation.
Going back to the current example, after 1 hour waiting an Email will be sent to the Subscriber with recommended destinations and an special price if he buys online.
Then you could set up a 1 hour verification time during which the Subscriber should visit the “Make your Payment” page, and define two actions in case he has done it or not.
Once you’ve finished all the stages of your Automation flow, click on “Start Automation”. It’s already working! Your final flow may look like this:
 Final considerations
Three final clarifications:
- Subscribers who join your Doppler Lists from the tracking performed by Site Behavior will have Data Hub assigned as source data. You can see at the Master Subscriber List filtering by the “Subscriber’s Origin”. This information will help you to make decisions such as the mass association of those Subscribers to the List that you define.
- Once your Automation flow is active, clicking and going into that you’ll find the Summary of Metrics. On “View the complete Report” button, you’ll see all the details. You may also see all the stages of the flow in “read-only” mode. If you want to delete or edit any element you have to click the “Stop Automation” button. If you do this, all the Subscribers will lose the associated actions in the flow.
 The visualization of the summary of metrics and the elements included on each flow are now available for all the Automations Campaigns that you create with Doppler, so that you can see the performance of each one of your Campaigns.
- Your Automation flow will add new Subscribers constantly. If at any time you are out of credits in your current Plan, it won’t join any new contact and will keep them all as “Waiting for Update Plan”. To know more about this new featured and how to active them read this article.
That’s all. Have a great Campaign!


Hola los felicito por tan excelente opción, de ser posible me gustaría sugerir un opción para poner variables de búsqueda en las urls de seguimiento, ejemplo:
1. que contenga (colocar solo una parte de la url y el sistema)
2. excluir urls que tengas.
Muchas gracias
Buenos días Mauricio, gracias por tu sugerencia. Si quieres explicarte mejor, lo tendremos en cuenta para optimizar el contenido de este artículo de ayuda. Saludos, Joaquín de Doppler
Excelente! Ahora puedo clasificar mis clientes tibios en forma automática entre otras cosas. Hay mucho jugo que sacarle a esto =)
¡Las posibilidad son infinitas! Qué bueno que lo hayas notado Germán. ¡Muchos éxitos con tus flujos! Saludos, Claudio de Doppler.
Hola, tengo mi sitio web en GoDaddy y está desarrollado con el sistema de plantillas, se supone que creando una sección HTML debiera funcionar el código, pero no es así….. hay alguna opción para este tio de paginas?
Gracias
¡Hola Alejandra! Puedes encontrar toda la información sobre tu consulta en este Link: https://help.fromdoppler.com/es/como-activar-domain-keys/ . Cualquier duda, estamos a tu disposición. Saludos, Sole de Doppler.