 ES
ES EN
ENHow to integrate your Adobe Commerce store
Do you want to stay in touch with your customers and prospects from your Adobe Commerce store in a practical and organized way? With Doppler you can integrate your e-commerce and carry out your email and automation marketing strategy without wasting time. In this post we will tell you how to synchronize your accounts to get the most out of both platforms.
The integration can be done from your Doppler account or from the Adobe Commerce administrator (but not from both simultaneously). We will see how to do the integration from Doppler and from the Adobe Commerce administrator, so you can choose the way you prefer.
How to perform the integration from Doppler?
First, you have to log in to your Doppler account. You still don’t have one? Start by creating a free one here. Remember that by being an Adobe Commerce user you access to the exclusive benefit of 35% OFF on Monthly Plans and duplicate credits on Prepaid Plans.
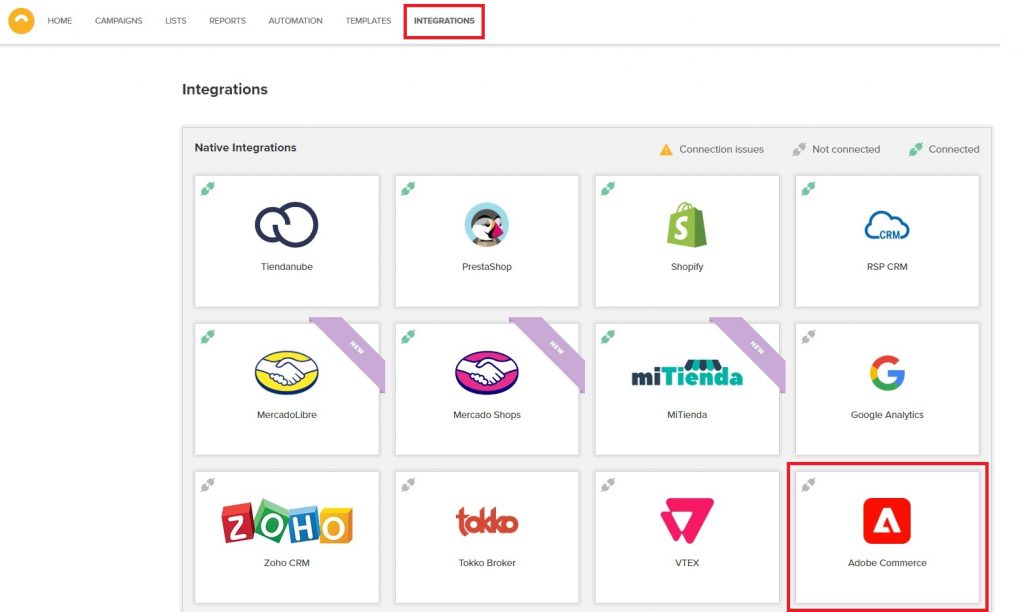
1 – Choose the “Integrations” section of your account. Once you log in, select the Adobe Commerce logo.
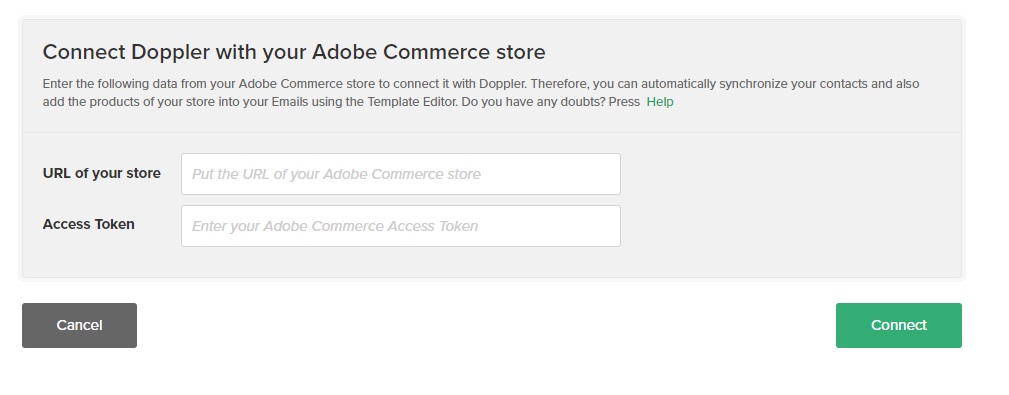
2 – On the next screen you will access the first step to connect your Doppler account with your store. You need to complete the field “URL of your store” with the web link of your store in Adobe Commerce and the “Access Token” (you can get it in your Adobe Commerce account, below we explain how). Once you have done this, click on the “Connect” button.
3 – Once connected, you can link data between both accounts.
Synch your data
Easily synch data entities from your Adobe Commerce store to your Doppler lists.
1 – Choose the contact lists of your store to automatically import to the Doppler lists you select.
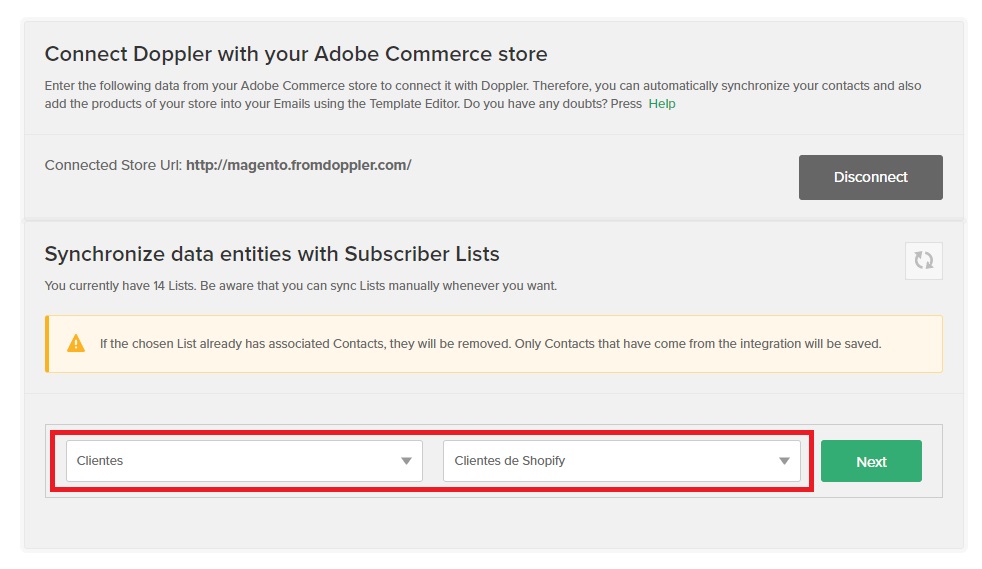
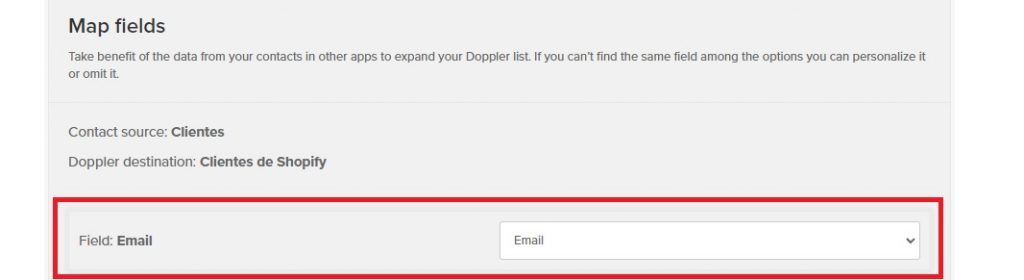
2 – Then perform a field mapping to link the data so that the source and destination fields have a correspondence when synchronized. Just select the list in which you want to link your fields and select the ones you want from the drop-down options.
3 – Select the green “Synchronize” button at the bottom right to finalize your selection.

- As long as you have your accounts connected, you will always be able to edit or delete the synchronization. That is, choose the “Edit synchronization” icon to change the field mapping or the “Delete synchronization” button to remove the link to that list and select another one.

How to get the Access Token from Adobe Commerce
To get the “Access Token” and continue with the integration, you must follow a few simple steps inside your Adobe Commerce account.
1 – Once logged in, go to “Integrations” under the “System” section.
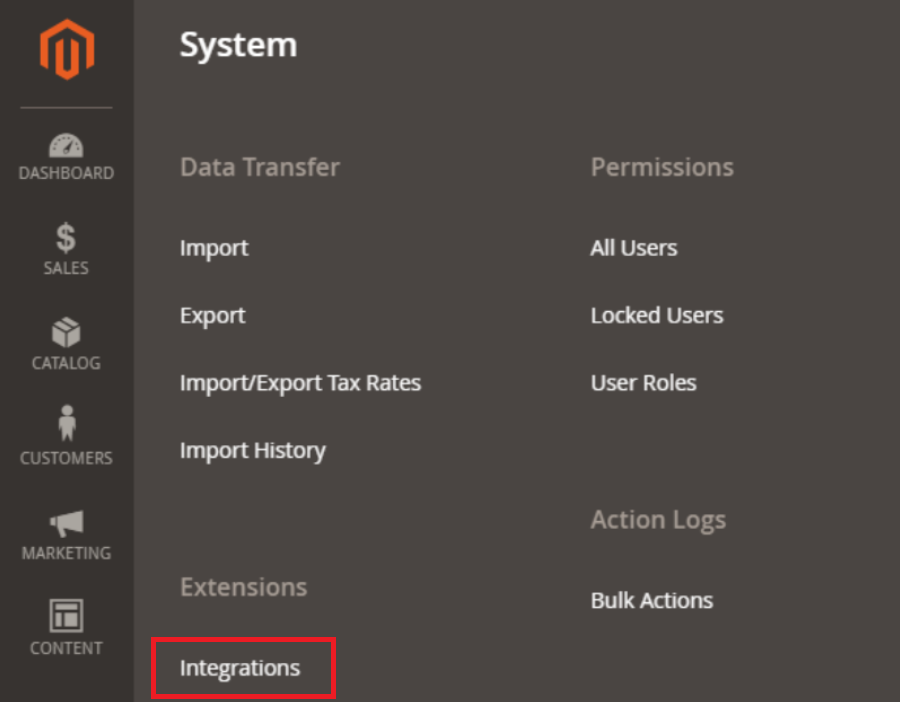
2 – Select “Add New Integration”.

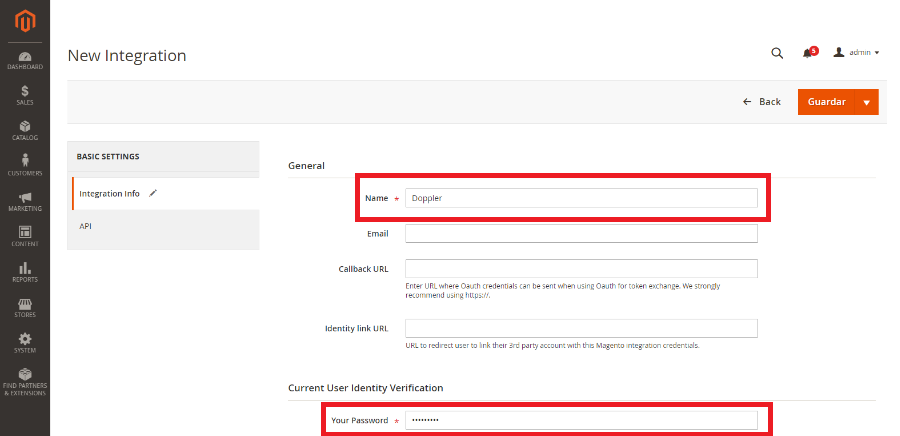
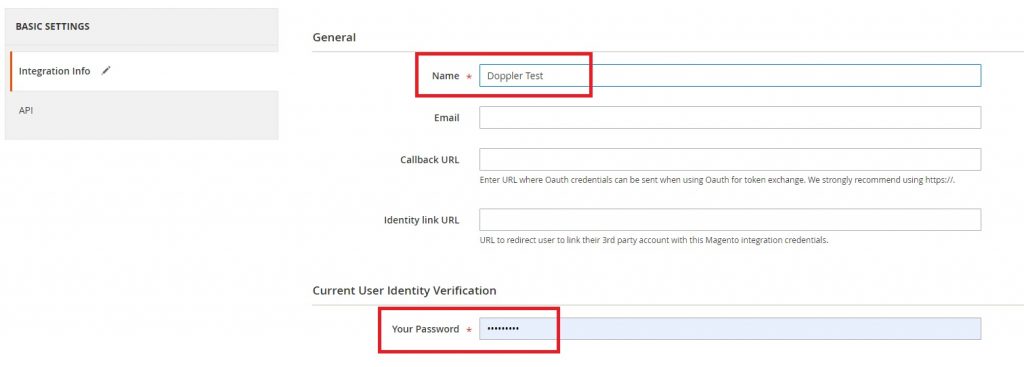
3 – On the next screen, you must enter the information of your new integration. You only have to fill in the fields “Name” and “Your Password” of your Adobe Commerce account.
4 – Make sure to keep the “All” option active in the next “API” section so that Doppler can access all the API resources of your store.
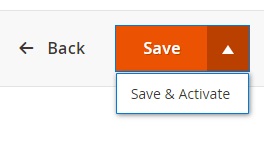
5 – Once you have finished completing these sections, select “Save”. There you have a drop-down menu to select “Save & Activate”.
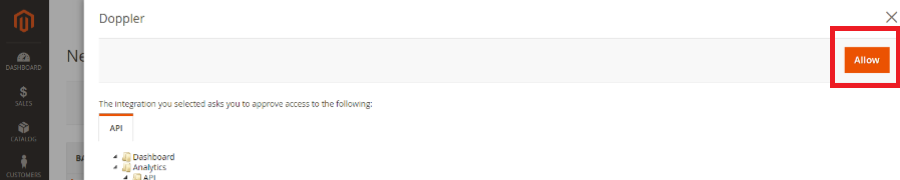
6 – Then you will see the following screen where you will be asked to confirm access to all the information required by the API. There you have all the details. Tap the “Allow” button to advance your integration.
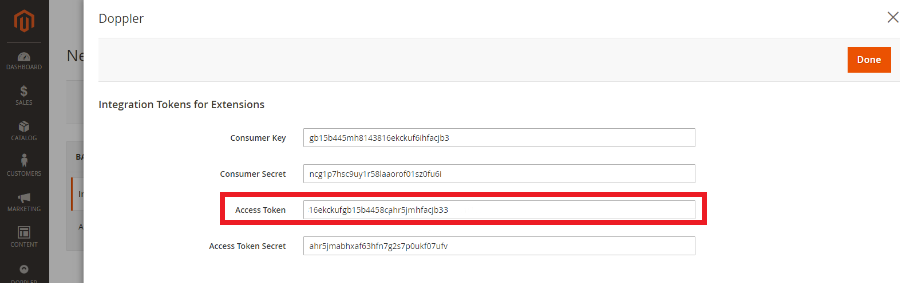
7 – Copy from here the “Access Token” that will be requested in the Doppler screen to complete the integration.
How to resolve an error in the integration with Magento
Now we will see what you can do in cases where an impediment arises that allows you to continue in the permissions progress when integrating with the API.
1 – In the following error that you see:
“message”: “The consumer isn’t authorized to access %resources.”,
“parameters”: {
“resources”: “Magento_Backend::store”
}
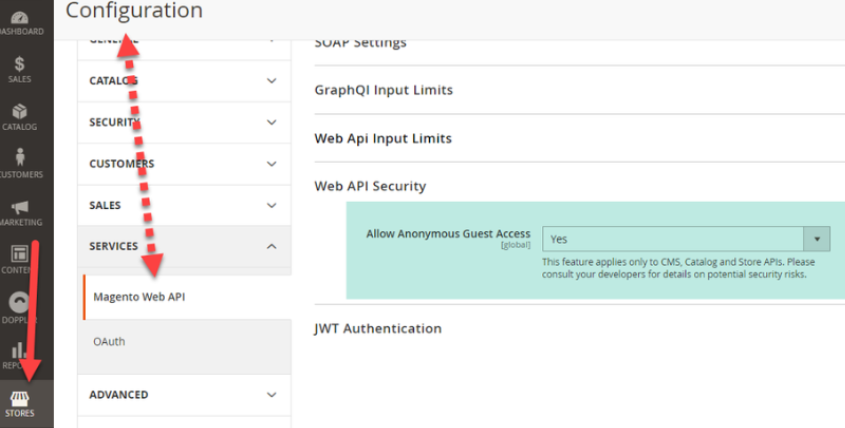
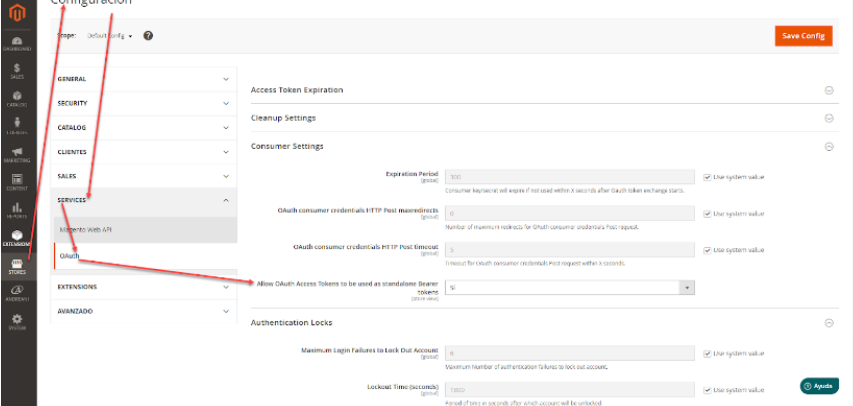
What you need to do is enable an option in Magento settings. First of all, you must go to Stores, then Settings, select Services and there choose the option: Magento Web API.
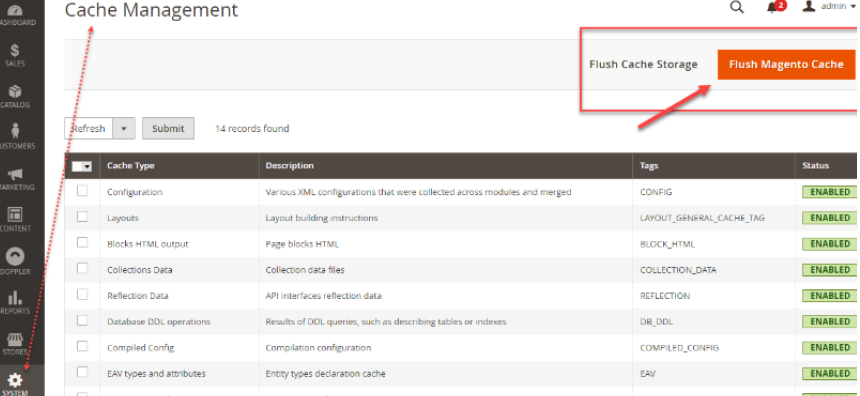
2 – Next, we recommend that you clear cache and refresh the page, to see the change updated at the time.
3 -It is important that you keep in mind that if the error continues to persist, you should check what type of version you have. We recommend you use a version greater than 2.4.5
4 – Then, you should modify the following configuration:
First of all, go to Store. There in the Settings option, Services and within this category choose OAuth and click on Allow OAuth Access Tokens. Through this selection, you will be able to access through independent bearer tokens.
How to integrate from the Adobe Commerce administrator
To start, you must download the Doppler extension for Adobe Commerce. Follow these steps.
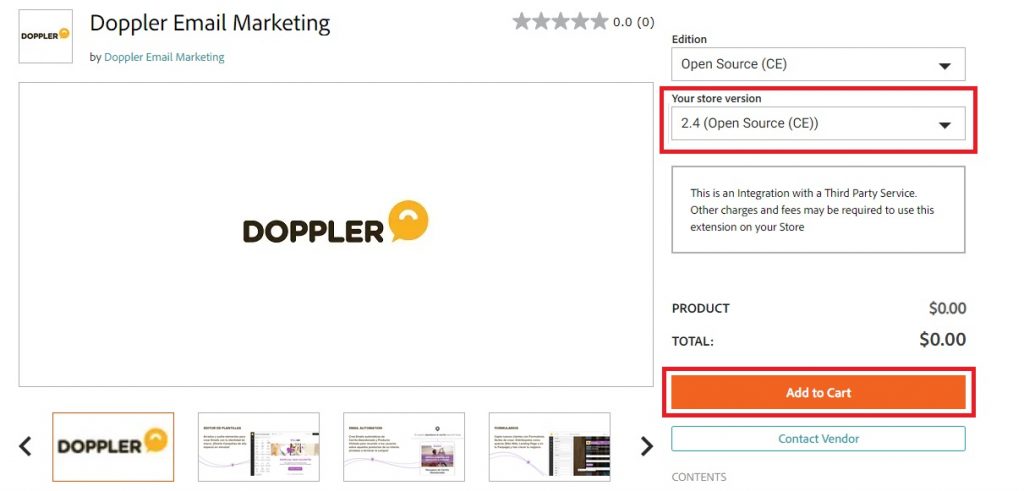
1 – Go to the Doppler extension download page in the Adobe Commerce marketplace.

You will be asked to log in with your AdobeID user. If you don’t have a user you can create one or log in with your Gmail, Facebook or Apple account. Although the process is similar to a purchase, it is a completely free download.
2 – Choose your Adobe Commerce store version of the extension and select “Add to Cart”.
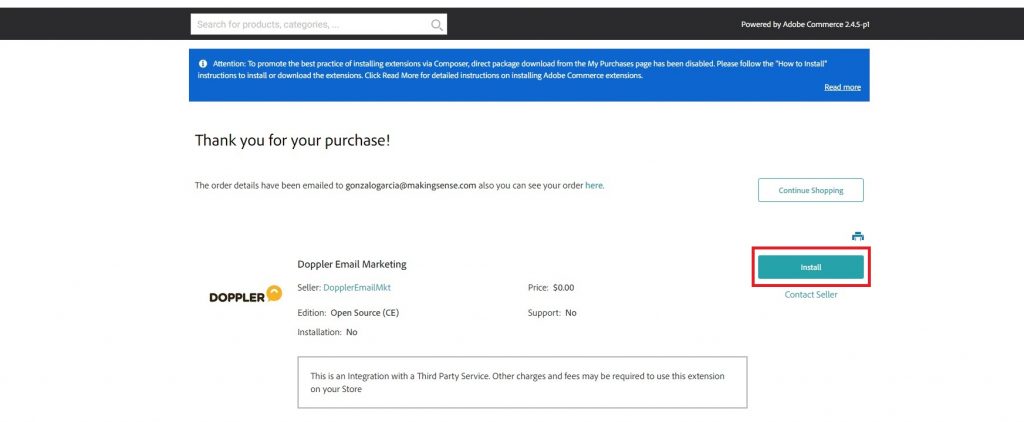
3 – In the upper right corner, select the cart icon and then the “Proceed to Checkout” button.

4 – The next step is to install the extension. In order to install it on your Adobe Commerce server, it is recommended that you contact an Adobe Commerce expert or developer.
Integration configuration
Once you have the module installed, it is time to configure the integration.
1 – Login with your username and password to the Adobe Commerce administrator.
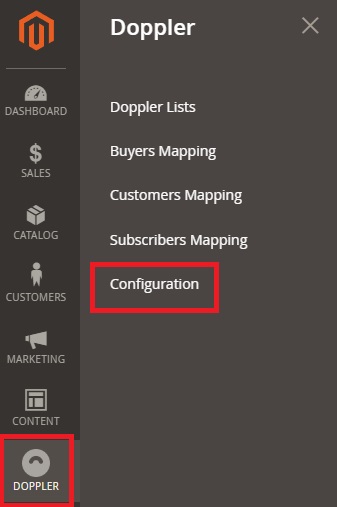
2 – On the left side you will see the Doppler icon. By clicking there you will see the options “Doppler Lists”, “Buyer Mapping”, “Customer Mapping”, “Subscriber Mapping” and “Configuration”. Click on “Configuration”.
3 – The next step is to configure the integration. Choose this option to see a series of fields that you must complete and select.
- Enable: Yes.
- Username: here you can enter the email of your Doppler account.
- The API key of your Doppler account. Here you will see where to find it.
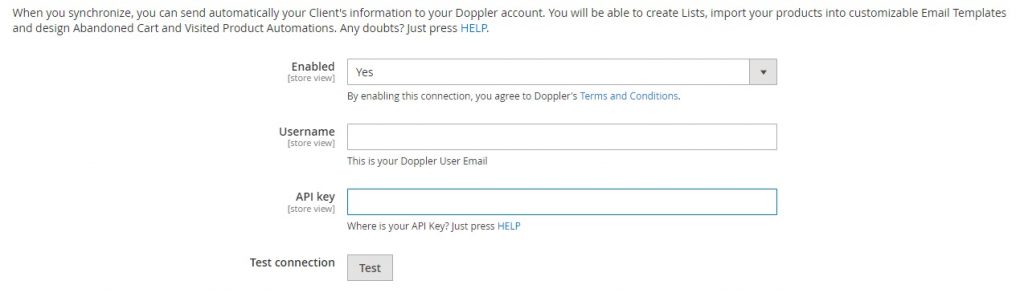
By clicking on “Test Integration” you will know if there is any missing or wrong data. Otherwise, the integration will be done.
4 – Scroll down with the cursor to the “Synchronization” section. Here you will be able to activate the synchronization Cron and determine the frequency of synchronization. Select the “Synch” button to save the changes.
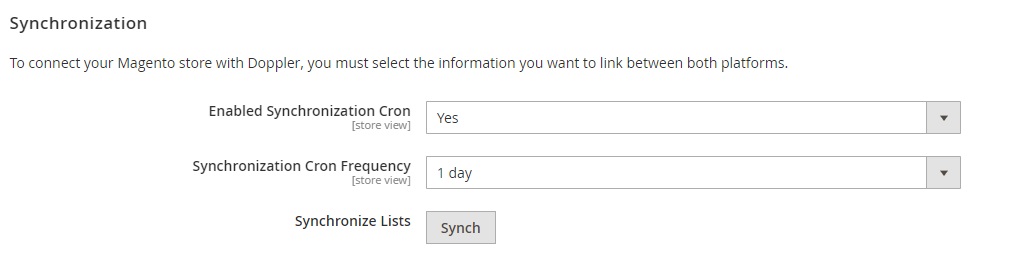
That’s it! Click “Save Config” to finalize the integration of your Adobe Commerce store with Doppler from the Adobe Commerce administrator.
Important: about Cron settings
The extension works with the native Adobe Commerce cron configuration, which is used to schedule and synchronize store information with your Doppler account.
If the Adobe Commerce cron is not configured or is configured incorrectly, the extension will not be able to synchronize your account data. We recommend that you review the official Adobe Commerce documentation for configuring and running cron.
Perform field and list mapping
This action will synchronize the Adobe Commerce data entities with your Doppler subscriber lists, along with all the information you have about them and that will be stored in basic and custom fields in your account.
In Adobe Commerce users are differentiated between those who:
- Have subscribed to your newsletter from a form in your store;
- Have made purchases and have associated orders;
- Have registered in your store or have started a purchase process, but did not finish it (“abandoned cart”).
In Doppler these three types of users correspond to categories that we call “Contacts”, “Buyers” and “Customers”. In Adobe Commerce from the Doppler section you access the mapping of each of these three, as shown in the menu above.
What should you do in each case? If you have already created in Doppler the list and custom fields that you want to link to each entity, simply select them and at the end click “Save Rows”.
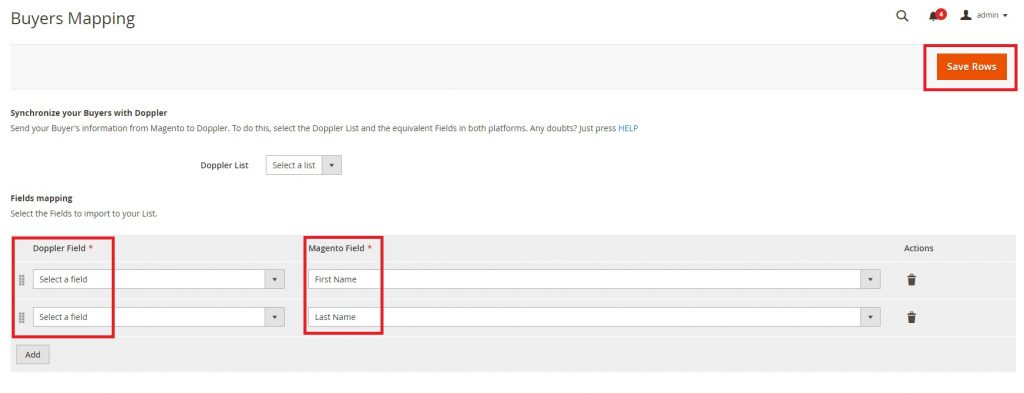
Note: Magento, as it appears in one of the columns and in some parts of the administrator, is the old name of Adobe Commerce.
Inserting Doppler scripts in Adobe Commerce
From the “Scripts” section of “Configuration” you will be able to program your Doppler Pop-up form, as well as include the HTML code that Doppler provides you with to be able to track on site and know the behavior of your users in your store. This script is the one that will allow you to send “Cart abandoned” and “Product visited” emails.

To insert a Pop-up form:
- Once you have created your pop-up form from your Doppler account and published it, you will access the screen with the code that you must copy.
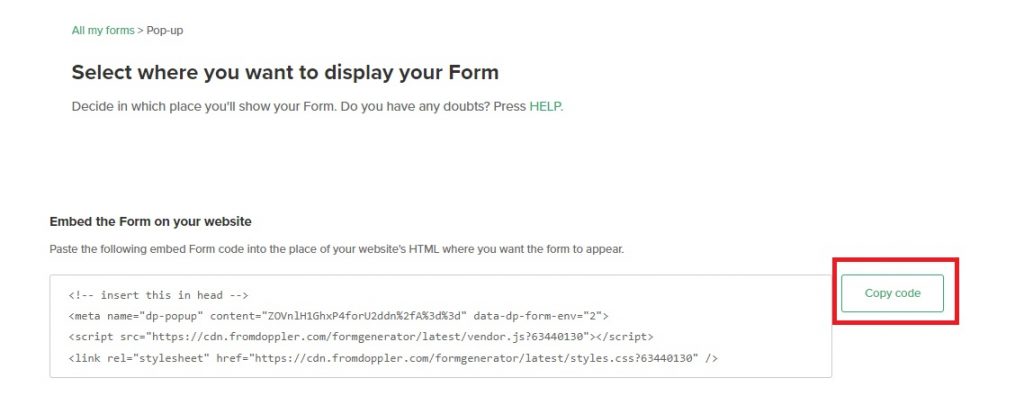
- Now simply paste it into the “Popup Head” box. Don’t forget to save the changes by clicking on “Save Config”.
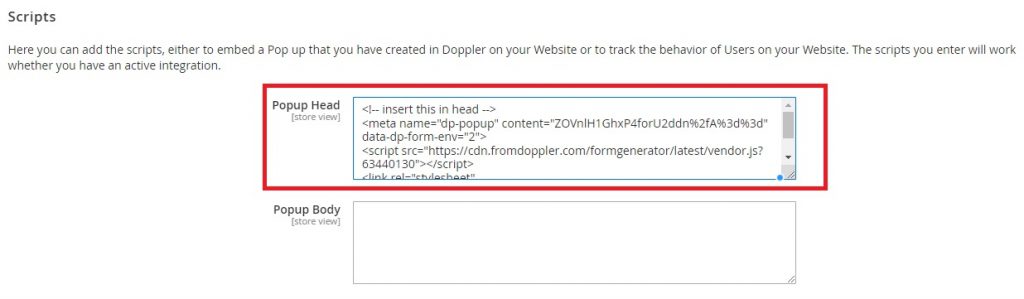
If the form you want to insert was created several months ago, and you notice that the HTML code you want to insert is much longer, you probably need to split it and paste a part in “Popup Head” and another part in “Popup Body”. In this case, we suggest you contact our Customer Service area.
On-site tracking no longer requires a script and will work automatically once you have added and verified your store’s domain in Doppler.
Do you have any doubts about the functionalities or with any step of the process? Contact us and we will help you.


Buenas tardes, nosotros tenemos una tienda en magento, cuales serian las ventajas de integrarla con doppler. Gracias. Fabian
Hola Fabián, ¿Cómo estás? El principal beneficio de integrar tu cuenta de Magento con Doppler es que no tendrás que cargar tus contactos manualmente desde tu Tienda hacia Doppler, se sincronizarán automáticamente.
También, tenemos plantillas pre-diseñadas especialmente para Ecommerce que te serán de gran ayuda y potenciarán tus ventas.
Por último, pero no menos importante, recuerda que por ser usuario de Magento posees un beneficio exclusivo del 35% de descuento en Planes Mensuales y duplicación de créditos en Planes Prepagos: http://partners.fromdoppler.com/magento-beneficios
Cualquier consulta que tengas, no dudes en escribirnos nuevamente.
Saludos,
Nacho de Doppler
hola, tienes integración con magento 2.x
¡Hola Fabian! Actualmente integramos con Magento 1.x, aquí puedes ver cómo implementarla: http://ow.ly/vn2M30iuKhc En cuanto a la versión 2.x, tenemos proyectado desarrollarla en un futuro. Saludos, Joaquín de Doppler.
Hola ¿Para que versión de Magento es esta información? funciona para magento 1.9
¡Hola Gonzalo! De acuerdo a las políticas de ciclo de Vida del Software de Magento, ya no se brindará soporte para la versión de Magento 1. En este artículo te mostramos cómo sincronizar Doppler con Magento 2.
Hola
Estoy tratando de integrar doppler con mi magento 2.1.12 y sigo todos los pasos indicados pero al momento de colocar el sitio web y el token generado me arroja el error
“Ouch! estos no son datos de conexion para Magento”
Como puedo saber que me falta o en que me he equivocado
¡Hola Rodrigo!
¿Has podido solucionar el inconveniente? Igualmente, uno de nuestros representantes de Atención al Cliente se pondrá en contacto contigo para brindarte soporte.
Saludos, Sole de Doppler