 ES
ES EN
ENHow to create Custom Fields for GDPR
You have already sent your Revalidation Campaign and have programmed two different actions according to your Subscriber’s behaviour. The next step is to create Custom Fields in your Doppler account, to add the consent of those who answered affirmatively as a Subscriber Attribute to your Lists.
Essentially you must create two Fields: one that expresses the user’s agreement with your Privacy Policy, and another that enables you to send them commercial communications.
To begin, log in to your account. If you do not have one, create it for free now. The procedure is the same as any other Custom Field; if you have doubts about how to create it you can review this article to learn how to put it into practice step by step
When creating these two Custom Fields for GDPR in Doppler, you must define:
- Custom Field’s name: it could be something like [[[acceptPrivacyPolicy]]] and [[[acceptReceivePromotions]]]
- Type of Data: Permission
- Type of Custom Field: Public. This will allow the Subscriber to modify this information if desired. In order to achieve this, you must add the corresponding link in all your Campaigns. This can be configured from the Control Panel located in the upper right margin of your account, in the “Header and Footer Email” tab, by checking the option “Update Profile”.

How to add these Subscriber Attributes to those who answered your Revalidation Campaign
Now it remains to complete the Custom Fields that you created so that this consent appears in the information of each Subscriber. To achieve this you must:
1- Download the List of revalidated Subscribers.
2- Create a new Excel file, copy all the Emails of your Subscribers and add the columns AcceptPrivacyPolicy and AcceptReceivePromotions.
3- Select “yes” to both in the row corresponding to the first Revalidated Subscriber Email.
4- Place the mouse cursor in the lower right margin of the cells that contain “yes”, and stretch it to the last row that contains the last Email.
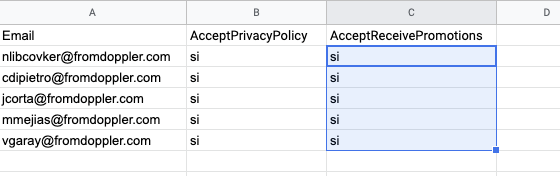
5- Save the file with the .csv extension.
6- Enter the list of subscribers revalidated in Doppler, click on “Import Subscribers” and find your .csv file or drag it. This contains the updated information of the Fields [[[AcceptPoliticaPrivacy]]] and [[[AcceptReceivePromotions]]].
7- Click on “Import”.
That’s it! Your List now contains updated information of your Subscribers, which will be very useful for your next Campaigns. To learn who to include in your future Campaigns, you can set up a Segment and filter in the [[[AcceptReceivePromotions]]] field to those who said “no”, and then subtract that Segment from the original List or the shipment
Many successes with your adaptation to the GDPR!


Doppler informs you that the personal data that you provide to us when completing this form will be treated by Doppler LLC as responsible for this web.
Purpose: To allow you to make comments in our help center.
Legitimation: Consent of the applicant.
Recipients: Your data will be saved by Doppler and Digital Ocean as hosting company.
Additional information: In the Doppler Privacy Policy you’ll find additional information about the collection and use of your personal information by Doppler, including information on access, conservation, rectification, deletion, security, cross-border data transfers and other issues.