 ES
ES EN
ENHow to integrate Doppler with your WooCommerce store
Do you want to enhance your Online Store with all the benefits of Email and Automation Marketing? You are in the right place! In this article we will see the step by step to integrate Doppler with your WooCommerce store:
- How to download and install the Doppler plugin for WooCommerce.
- How to map and synchronize Lists.
- How to map Fields between platforms.
- What are the main Doppler functionalities that you can take advantage of in your E-commerce.
Let us begin!
How to download and install the Doppler plugin for WooCommerce
IMPORTANT: Before moving forward, make sure you have the Doppler Forms plugin correctly installed and configured in your WordPress admin. Find more details in this article.
1- In the Plugins section of your WordPress account, go to Add new and enter Doppler. Choose the Doppler for WooCommerce plugin and click Install now.
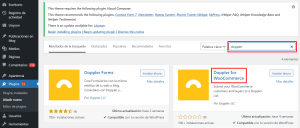
2- When you complete the installation, you will see it in the Installed Plugins section of your WordPress account.
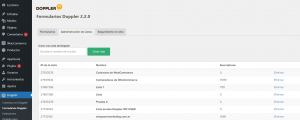
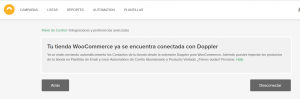
If you have correctly configured the Doppler Forms plugin, you will have already entered your Doppler user Email and your API Key. This connects your Doppler account to your WooCommerce store.
In that case, from the List Management tab of the Doppler Forms plugin you should be able to see the Lists that you have created in Doppler:
Otherwise, follow the steps here to connect both platforms.
Ready! You are now in a position to perform List mapping and synchronization so that the information you have in your store is reflected in Doppler.
How to map and synchronize Lists
So far you have successfully installed the Doppler plugin for WooCommerce in your WordPress admin, but information is still not being shared between platforms. For this you must:
1- Enter the Doppler plugin for WooCommerce, where you will see two fields to configure:
- The Doppler List to which you want to send your store’s Buyers (that is, who have at least one generated order).
- The Doppler List to which you want to send the Contacts of your store (they are those who have subscribed to receive news from your store, but have not yet purchased from you. When they do, they will also be on the List that brings together the Buyers of your store).
In both cases you can choose the Lists you want, and even create new Lists from the plugin, without having to do it from Doppler.
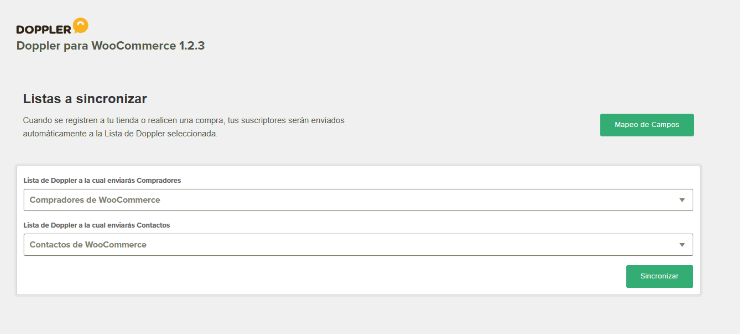
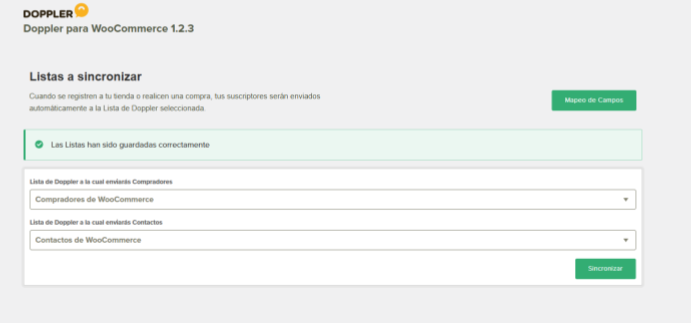
2- When you have chosen the Lists for each case, you simply have to click on the Synchronize button. How to know if the connection has been made successfully? You will be informed in at least three places:
- Within the Doppler WooCommerce plugin, a green message at the top of the screen will tell you that Lists are correctly synced.
- At the bottom of the same screen you will see the Doppler User who has connected to your WooCommerce store.
From the Integrations section of your Doppler account you can verify that the connection is made, and it will allow you to disconnect it from there.
Now that you have your Lists synchronized, you can take the next step: Field mapping so that the information you have in WooCommerce is stored correctly in the Basic and Custom Fields that you have in your account.
How to map Fields between platforms
1- From the Doppler plugin for WooCommerce, click on the Field Mapping tab. There you will see all the WooCommerce information fields divided into “Billing Fields” and “Shipping Fields”.
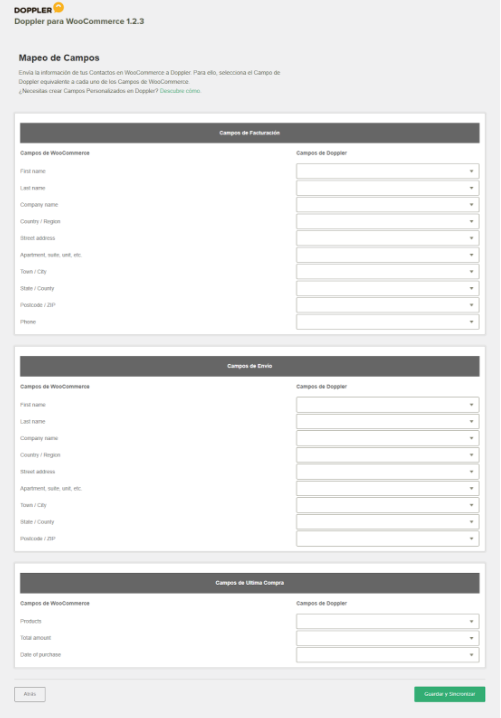
2- In the Doppler Fields columns you will see certain fields that you have in your account mapped by default. If you wish, you can map others simply by displaying the list of available fields and identifying the one that corresponds to the WooCommerce field.
If you skip mapping for a certain field, that information will not be saved to your Doppler account.
3- When you finish mapping the Fields, don’t forget to click on the Save button.
Good job! You have completed the mapping of Fields between platforms and the information will begin to be saved as you have arranged. Additionally, your WooCommerce Buyers and Contacts will now be automatically syncing to the Doppler Lists you’ve defined.
Discover the features of Doppler to enhance your WooCommerce store
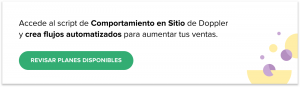
Thanks to Doppler’s On-Site Tracking script you can create automated flows to increase the Conversion Rate of your E-commerce. Are you interested? Find out what it’s all about!
Doppler provides a piece of HTML code that you insert into the Onsite Tracking section of the Doppler Forms plugin. Thanks to this script, Doppler can access information about everything that happens in your store: how many people visited it, what pages they browsed, what products they viewed, and whether they left a purchase halfway (i.e., an “abandoned cart”).
From this data, you can configure automated flows in simple steps with 100% personalized information for each visitor. This way the chances of them returning to your store and buying increase!
The Site Tracking script is available for all paid Doppler accounts. Sign up for your Plan now to use it without delay!
Once you have your Plan you will be able to create automated flows in your account. You will find all the information you will need in the following tutorials:
- Onsite Behavioral Automation: how to activate and use it
- How to Create an Abandoned Cart Automation
- How to create a Visited Product Automation
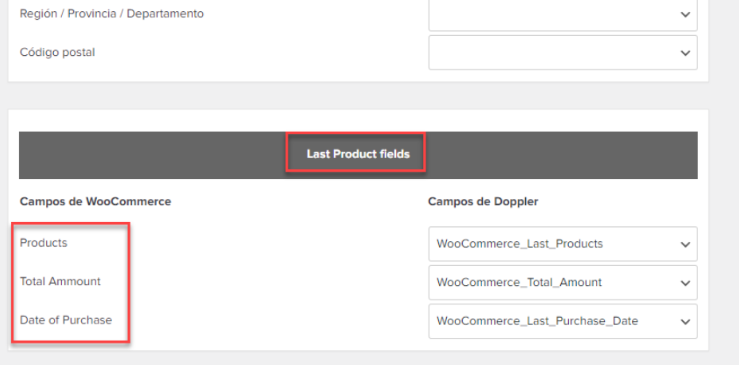
Now also, with this integration you will obtain the information of the last product that your users purchased in your store. What would this benefit? You will be able to know certain WooCommerce fields in detail, as shown in the image:
- The information of the last product that was purchased.
- Date of purchase.
- Last purchase amount.
We have reached the end! Now you know how to integrate Doppler with your WooCommerce store and you know all the benefits that this will bring to your E-commerce.
Have a great Campaign!


Hola, en el Mapeo de Campos no figura el correo. Se envía automáticamente?
Hola
Para resolver este tipo de casos lo mejor es que te contactes con nuestro equipo de Soporte escribiendo a [email protected]
.
¡Estamos para ayudarte!